See my latest recipe–delicious green beans with three ingredients and two minutes of prep time–here!
Tag Archives: recipe
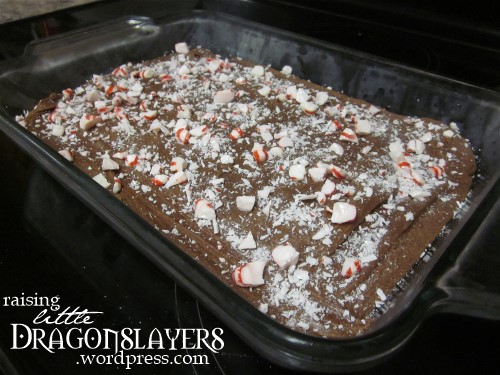
Peppermint chocolate fudge.
I know this is the wrong time of year for this…but I don’t care. In my opinion, there is no wrong time of year to make fudge.

Peppermint chocolate fudge.
This is a twist on the classic fudge recipe my mom gave me years ago (and she makes the best fudge). I’m pretty sure it’s the same recipe that’s on the Kraft marshmallow creme jar, but with microwave directions instead of stovetop. Still, you know those fudge squares that you spend four bucks on because it’s just so good? This is every bit as good (with or without the peppermint). I promise, you won’t be disappointed!
Here’s what you’ll need:

Ingredients
- 1 1/2 sticks butter
- 3 cups sugar
- 5 oz. can evaporated milk
- 2 cups chocolate chips (or 12 oz. Baker’s semi-sweet chocolate)
- 7 oz. jar Kraft marshmallow creme
- 1 tsp vanilla
- 1 capful peppermint oil
- 10-12 Starlite peppermint candies
(Omit the last two ingredients for classic chocolate fudge. Which is also delicious.)

Use a large (4-qt is good) microwaveable bowl. Start with just the butter.

Microwave butter until melted (usually about a minute on high will do it).

Add sugar and evaporated milk.

Mix well. Microwave three minutes. Stir. Microwave two minutes. Stir well, scraping bowl.

Microwave another three minutes. Stir. Microwave another two and half minutes. Can you guess what you do then? (…Stir!)

Add the chocolate chips and stir until melted.

Add the marshmallow creme, vanilla, and peppermint oil and stir well to mix.

It takes a while.

Eventually it will all come out the same color.

Dump it into a greased 9″ x 9″ or 13″ x 9″ pan. You can use a spatula or the back of a spoon to smooth it out.

This part is pretty fun.
You’ll need to crush the candies before using them to top the fudge. Put the unwrapped candies in a ziploc bag. Find a hard, undamageable surface (I used the marble in front of my fireplace; I’ve also used the driveway or sidewalk in the past). Lay down a towel, put the bag of candies on one half of it, and fold the towel over so the bag is sandwiched between the towel layers. Then go to town with a hammer! I usually use an actual hammer for this, but I found this meat pulverizer in my drawer (I think my mother-in-law must’ve bought it last time she was here), which worked quite well (I used the flat, not pokey, side).

Do feel around and aim for the whole candies and big chunks, and don’t hit harder or more often than you need to. You don’t want all dust. Also, the sharp pieces can poke holes in the bag, which is the main reason you need the towel.

Use your fingers to drop the candy pieces over the fudge.
Let it cool at room temperature (or refrigerate) before cutting it into squares.

Then, EAT YOUR WEIGHT IN FUDGE. This stuff never lasts long in my house! It’s sooooo gooooooooooood…..
But, a word of warning…

This is what those pretty candy pieces will look like about twenty-four hours later. So, if you’re making this for a party or event, don’t do it the day before! Or at least don’t add the topping until the day of. I have no idea what causes the candies to…melt…or whatever, but it’s not very pretty. It does not, however, affect the taste! In fact, I actually prefer it softer, over the crunchiness of the fresh candies.
Here’s the recipe, for your cut-and-paste convenience:
(Peppermint) Chocolate Fudge
- 1½ sticks butter
- 3 cups sugar
- ⅔ cup evaporated milk (5 oz can)
- 12 oz Baker’s semi-sweet chocolate (or 2 cups chips)
- 1 jar (7 oz) Kraft marshmallow crème
- 1 tsp vanilla
- Optional: 1 capful peppermint oil
- Optional: 12-16 Starlite peppermint candies, crushed
- Microwave butter in 4-quart bowl on high for one minute or until melted.
- Add sugar and evaporated milk. Mix well.
- Microwave 3 minutes. Microwave 2 minutes. Stir well, scraping bowl.
- Microwave 3 minutes. Microwave 2½ minutes.
- Stir in chips until melted.
- Add remaining ingredients (except for crushed candies, for peppermint fudge) and mix well.
- Pour into greased 9×9 or 13×9 pan (for peppermint fudge: top with crushed candies).
- Let cool at room temperature (or refrigerate) before cutting into squares.
Enjoy!
The Chex Mix.
Anyone else counting down the days till Dragon*Con? I got my “progress report” in the mail last week and drooled over it for half an hour. Most excited for: Amy Acker! She was scheduled for the Whedonverse and “Dollhouse” panels I attended last year, but had to cancel at the last minute due to illness. Super excited to get to see her this year (*fingers crossed she remains in good health*)! Biggest disappointment: NO WALKING DEAD. I mean, NONE. Last year, the stars of the show were scheduled for four panels over the weekend, one each day of the con, and even though I was a full season behind (damn you, Netflix), I decided to go despite the inevitable major spoilers. Wil and I waited in line for nearly two hours for the first panel (on Friday); once everyone was in and seated, we got word that the cast was running late….and half an hour later, it was determined that they would not make it at all. But it was early in the con….surely I could catch them later, right? I had scheduling conflicts the following two days, so I tried again on Monday….to the same result. Seriously, they made it to the two I couldn’t go to, and ditched the two panels I did–BOTH of them! And this year, we’ve actually had cable, so I watched season four live, and I was so looking forward to being able to enjoy the panels without spoilers. But NO ONE from WD is on the list in the progress report–and the show’s freaking filmed IN ATLANTA!! GAH! So. Disappointing.
Anyway….now that that’s out of the way, I’m cheating a little on this post. I’m sharing an awesome recipe that isn’t mine, but it’s just too good not to urge you to try it….
You’ve probably seen it on Pinterest: “Better Than Sex” Chex Mix.

I think it really is…
I did make a couple changes:
First, the recipe only calls for one cup of mini Reese’s cups. Like that’s enough chocolate candy. (Psh.) I’ve made this three times, and added a cup of Rolos or mini Rolos every time, and let me tell you, it is sooo worth it. I’ve considered adding M&Ms, too…or chunks of Heath bars…or Butterfingers….It’s a very customizeable recipe, so go ahead, add your own favorite candies! (Also, I omit the sea salt.)
Second, I am utter crap at melting chocolate. Even when I follow the directions to a T, I still end up burning it. Doesn’t matter how often I stir it, it still burns. So I use the double boiler method, without a real double boiler: I fill my smallest pot halfway with water, put it on medium heat, and balance my next-biggest pot on top of it with the chocolate dumped in. It takes longer, I’m sure, but at least I don’t burn endless cups of chocolate chips that I’d rather eat than waste!
All in all, it’s kind of a royal pain to make, but it’s soooo goooooood that you’ll make it again anyway.

Is your mouth watering yet?
And, of course, I have to tell you about the first time I made this. I’d stumbled upon the recipe on Pinterest and was looking for an excuse to make it shortly after we’d moved to Atlanta for my husband’s job. He works for a missions organization, so, naturally, most of his coworkers are current or former missionaries and church planters. And, naturally, my first opportunity to make this inappropriately-named dessert was for a work get-together….I kept my mouth shut as everyone dug in, but I’d made the mistake of mentioning to my husband what it was called, so after hearing a few exclamations of how good this stuff was, he turned to me and loudly asked, “What’s this called again?” In a room full of missionaries. Whom I barely knew. I turned bright red and mumbled the name under my breath, but, alas, he did not let me off so easy, and made me repeat it for everyone to hear. Fortunately, most Christians are actually not as uptight and prudish as you might think, and we all had a good laugh; the laughs continued as there were a couple concurrences on the truth of the name!
So, go make this Chex mix! It’s amazing. Some might say it’s even better than….never mind.
Fried Cheesy Bites.
One of the things I miss the most about Indiana is Culver’s. The closest one from where I live now is a good two hours away, so I haven’t been to one in a while now. There are two things on the menu that I miss in particular: they have best frozen custard (I like my Concrete Mixer with peppermint syrup and crushed pieces of Heath bar), and I could eat my weight in their Wisconsin Cheese Curds.
I’ve really been craving those cheese curds lately. So the other day, I loosely followed this recipe that I’d pinned ages ago, and made my own fried cheesy bites of heaven (okay, so they’re not as good as Culver’s’, but they’re still stinkin’ good).

Easy fried cheesy bites.
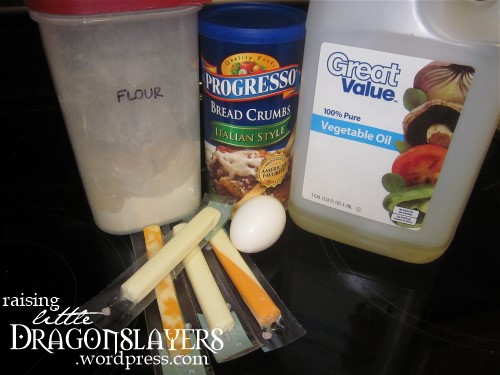
They’re super easy to make, and you only need a few ingredients.
Ingredients.
You’ll need:
- Vegetable oil (enough to submerge your cheesy bites in your pan)
- 4-5 sticks of string cheese (any kind)
- 1/3 – 1/2 cup flour
- 1 egg
- 1/3 – 1/2 cup Italian bread crumbs

First, fill your pan with enough oil to submerge your coated bites in (the amount will vary by the size of the pan). Heat the oil on medium heat while you start on your prep.

Assembly line!
Put the flour in one bowl, the egg (beaten) in another, and the bread crumbs in a third.

Experimentation time.
You’ll need four to five sticks of string cheese. I’ve made these three times this week, and I used all mozzarella the first two times, and decided to experiment with mozarella/cheddar and colby jack the third time.

Chop ’em up! How small you go is up to you; I like cutting mine pretty small so there’s more of them to munch on (yes, I understand that it’s still the same amount of cheese, no matter how you cut it).

Dump them in the flour.

Using a spoon, stir cheese pieces to coat them in flour.

If you have a little strainer like this, use it to shake out the excess flour. If not, just use your hands: pick up each piece and shake off the excess flour before dropping it into the beaten egg.

(The strainer works much better than doing it by hand.)

Dump the floured pieces into the bowl of beaten egg.

Using a fork, stir the cheese pieces to coat them in egg.

Next, move them a few at a time into the bread crumbs. Shake off excess egg; I find it’s easiest to fish a few pieces out of the egg with the fork, then pick them up with my fingers to shake them off and drop them into the bread crumbs.

Stir with the fork to coat the pieces in bread crumbs. Make sure that none of them are stuck together; you want each piece to be coated on all sides.

Now they’re ready for frying! Drop a couple pieces into the oil to see how hot it is. If they turn dark golden brown within seconds, it’s too hot–take your pan off the heat for a few minutes and turn your stove down a little when you put it back on, and then fry your bites in batches of a stick’s worth or so at a time, monitoring them so they don’t burn. If your trial bites stay pale (the oil should still bubble around them), then your oil’s not quite hot enough yet, but you can dump all the pieces in at once and they’ll fry slowly as it continues to heat. They turn out fine both ways (so long as you watchfully don’t let them burn).

Take them out when they’re a nice golden brown.

Put paper towels on your plate to absorb excess oil. Let them cool for a few minutes–but not too long, because they’re best hot!

Look at that glorious, golden, cheesy goodness…my mouth is watering now….
So they’re not quite Culver’s, but they’re pretty darn good, and super easy!

For your cut-and-paste convenience:
Fried Cheesy Bites
- Vegetable oil (enough to submerge bites in pan)
- 4-5 cheese sticks (any kind)
- ⅓-½ cup flour
- 1 egg (beaten)
- ⅓-½ cup Italian bread crumbs
- Heat vegetable oil in pan or skillet over medium heat.
- Chop cheese sticks into small bite-size pieces.
- Coat cheese pieces in flour.
- Shake excess flour off of cheese pieces.
- Drop cheese pieces into beaten egg and stir to coat.
- Shake off excess egg from cheese pieces.
- Coat in bread crumbs, taking care to coat all sides of each piece.
- Drop coated cheese pieces into hot oil; fry until golden brown.
- Remove golden brown cheesy bites from oil and let cool slightly on paper towel.
Enjoy!
Corn Flake Chicken.
This is my very favorite chicken recipe.

Corn flake chicken.
I’m a picky eater. I don’t actually like meat (of any kind). But this chicken dish is all crunch and garlic powder, which overtakes the chicken taste, and I love it.
Here’s what you’ll need:

Ingredients.
- 1 lb thin-sliced chicken breasts
- 2 cups corn flakes
- 1/2 Tbsp garlic powder
- 1/4 tsp salt
- 1/4 tsp pepper
- 1 stick butter
Preheat the oven to 350.

Start by grinding up two cups of corn flakes. My method is to dump them into a pie plate…

…and use a bowl (like a mortar and pestle) to grind them.

How finely you want to grind them is up to you; I try to avoid too much powder, but don’t leave any flakes whole.

Add garlic powder, salt, and pepper, to taste. I like a lot of garlic powder. (Like, a lot. Picture clouds of pale powder puffing up as I toss the flakes to mix it all up. So. Good.)

Mix the spices thoroughly into the corn flakes.

Melt the stick of butter in a bowl or shallow dish. (I melt it in the bowl I used as a pestle for the corn flakes; I’m all about fewer dirty dishes!)

Next, set up your assembly line!
I intentionally use thin-sliced chicken for this recipe because I like the corn flake-to-chicken ratio to be as high as possible. I’ve tried it with larger chicken breasts, and it just isn’t as good! I’ve stopped buying thin-sliced for everything else, to save money, but this one is worth the higher price.

Dip (and submerge) each piece of chicken into the butter.

Coat it with the corn flake mixture. (I roll it around a few times, then pile corn flakes on top of each side and press them into the chicken to get as much as possible to stick!)

Arrange the coated chicken in the baking dish.

Once they’re arranged, I sprinkle any remaining corn flakes over the whole dish, and pour a little bit of the leftover butter in for good measure (I love butter…).

Pop it in the oven, and bake at 350 for 25-30 minutes.

Done!

Delicious golden goodness…
And for your cut-and-paste convenience:
Corn Flake Chicken
- 1 lb thin-sliced chicken breasts
- 2 cups corn flakes, ground
- ½ Tbsp garlic powder
- ¼ tsp salt
- ¼ tsp pepper
- 1 stick butter, melted
- Preheat oven to 350.
- Mix corn flakes, garlic powder, salt, and pepper in shallow dish.
- Dip chicken in butter, then coat in corn flake mixture.
- Arrange coated chicken in baking dish.
- Bake 25-30 minutes.
Enjoy!
Chocolate peanut butter protein shake.
I have trouble finding ways to eat protein. I hate the taste of pretty much all meat (I’ve come to tolerate chicken; I do like turkey bacon and chicken nuggets, however), nuts give me massive headaches, eating eggs regularly makes me feel sick….It’s difficult.
One of my favorite ways to get a little extra protein, though, is my chocolate peanut butter protein shake.

Chocolate peanut butter protein shake.
As with all other protein sources, my body rejects it and makes me feel sick if I make it too often, but boy is it yummy! I would drink one of these every day if I could. (I envy all you people who can, you know, eat food….)
Here’s what you’ll need:

Ingredients (not pictured: ice…because, you know, it melts).
- Ice
- 1 cup milk
- 2 Tbsp Nesquik chocolate powder
- 1 Tbsp peanut butter
- 1 scoop protein powder, vanilla flavor
- 1 Tbsp semi-sweet chocolate chips
And, of course, a decent blender: I love my Ninja. It came with two single-serving cups, with blades that screw right onto the cups, and both blades and cups are dishwasher safe. I swear, I would never use my blender if I had to wash a pitcher by hand every time! This blender rocks. (And no, no one paid me to say that. I wish they would, though–it’d be easy money!)

Ice.
Start with ice. I fill my cup about halfway, but I like my shake thin enough to drink easily through a straw. Add more ice if you want it a bit thicker.

Milk.
Add one cup of milk. (I usually use skim, but all I had on hand today was Kaylie’s whole milk. Any kind will work.)

Chocolate powder.
Add two tablespoons of Nesquik chocolate powder. And don’t use that sugar-free crap; you can totally taste the difference with this stuff! Don’t be one of those people.

Peanut butter.
Add approximately one tablespoon of peanut butter. Peanut butter is one of those things that is a beast to measure out, of course, so I just eyeball it.

Protein powder.
Add one scoop of protein powder. I like this vanilla-flavored stuff from Sam’s Club.

Chocolate chips.
Add one tablespoon of semi-sweet chocolate chips. Or two tablespoons. Or half a cup. You know, sometimes it’s just one of those days when you need half a cup of chocolate chips. Don’t judge.

Assembled.
Mine always ends up a little past the “max fill” line, but I’ve never had a problem.

Love my Ninja cups!
The blade screws right onto the cup…very handy.

Ready to blend!
Screw onto blender…

Blended!
…and blend!

Done!

Chocolate peanut butter protein shake.
And for your cut-and-paste convenience:
Chocolate Peanut Butter Protein Shake (435 calories/31.5 grams protein)
- Ice
- 1 cup skim milk (90/8)
- 2 Tbsp Nesquik chocolate powder (60/0)
- 1 Tbsp peanut butter (95/3.5)
- 1 scoop vanilla protein powder (120/20)
- 1 Tbsp chocolate chips (70/0)
Combine all ingredients and blend thoroughly.
Enjoy!
Frozen Pineapple Cranberry Bites.
Summer’s coming! At least, I think it is….so this seems like a good time to introduce you to a great summer snack!

Frozen pineapple cranberry bites: three ingredients.
This one’s super easy, folks. Just three ingredients:

Three ingredients: crushed pineapple, whole cranberry sauce, and vanilla yogurt.
- 20 oz can crushed pineapple, drained
- 14 oz can whole-berry cranberry sauce
- 1 cup vanilla yogurt

Dump.
Dump all the ingredients into a large bowl.

Mix.
Stir to mix.

Spoon into mold.
Spoon into a freezable tray (I use my silicon mini-muffin trays).

Freeze.
Pop ’em in the freezer for a while.

Done!
Aaaaaand, they’re done.
See? Super easy.

I pop all of mine out of the tray and store them in the freezer in an airtight container, with foil between each layer. Whatever doesn’t fit in that gets tossed into a freezer bag; they stick together a little that way, but it’s not too bad.

It’s better than sugary popsicles on all those hot days coming up, right? (They are coming, right?)

Fun with shapes!
There’s always too much for just two trays, and I’m never in the mood to freeze them in batches, so I used one of my Christmas trays for the remainder.

Snowflakes!
These snacks hold their shape pretty well! At least until they start melting…

Cooooooold!
I think it’s been about a year since I last made these for Kaylie; she was a bit taken aback by how cold they were!
And for your cut-and-paste convenience:
Frozen Pineapple-Cranberry Bites
- 1 can (20 oz) crushed pineapple, drained
- 1 can (14 oz) whole cranberry sauce
- 1 cup vanilla yogurt
- Combine all ingredients in large bowl.
- Pour into freezable tray (e.g., silicon muffin tray).
- Freeze at least 3 hours.
Now, all we need is some warmer weather! 🙂
Cheesy Baked Pasta.
I love pasta. I love cheese. So, naturally, I love cheesy pasta.
But I don’t like it with weird stuff in it. Like mustard, or nutmeg. (I’m super picky. It sucks.)
So, this is a very basic-but-delicious dish of gooey goodness.

Cheesy pasta bake.
Here’s what you’ll need:

Ingredients.
- 16 oz rigatoni, ziti, or penne
- 16 oz jarred alfredo sauce
- 1/2 cup heavy cream
- 8 oz sour cream
- 2 eggs
- 15 oz ricotta
- 1/4 cup grated parmesan
- parsley, to taste
- 2 cups shredded mozzarella
Preheat oven to 350.

Cook pasta, in a big pot.
Cook the pasta according to package directions. Use a big pot; you’re going to have to dump it all back in there once it’s cooked and stir it in sauce. (I used a smaller pot once. It did not end well.)

What, you’ve never done this?
While the pasta cooks, pour the entire jar of alredo sauce into a large bowl. Then pour the heavy cream into the jar. Put the lid back on and shake well.

This is how you get ALL (or as much as possible) of the alfredo out of the jar.
Pour the contents of the jar into the bowl.

Alfredo, heavy cream, and sour cream.
Add the sour cream.

Stir to mix.
Stir to mix well, and set aside.

Beat the eggs.
Crack the eggs into a medium-sized bowl. Beat with a fork.

Eggs, ricotta, parmesan, and parsley.
Add the ricotta, parmesan, and parsley.

Stir.
Stir to mix well.

Stirred and mixed.
Once it’s thoroughly mixed, set it aside.

Drain pasta.
By now, the pasta should be done. If it is, drain it.

Back in the pot.
Dump drained pasta back into the pot.

Add alfredo mixture.
Pour the alfredo mixture into the pot with the pasta.

This is why we needed a big pot.
Stir to coat the pasta evenly.

Spread half of pasta in baking dish.
Spread half of the pasta in a greased 9 x 13 baking dish.

Add ricotta mixture.
Spoon ricotta mixture over the pasta.

Spread evenly.
Spread evenly with spoon or spatula.

Add the rest of the pasta.
Spread the remaining pasta over the ricotta mixture.

Top with mozzarella.
Top evenly with mozzarella.

Baking time!
Bake at 350 for 25-30 minutes.

Done!
Remove when the cheese is bubbly and beginning to brown.

Delicious cheesy goodness.
So good! It’s also good reheated–with our family size, we could easily cut the recipe in half and have plenty for dinner, but I make the full amount every time because then I get leftovers! 🙂
And for your cut-and-paste convenience:
Cheesy Baked Pasta
- 16 oz pasta (rigatoni, ziti, or penne)
- 16 oz jarred alfredo sauce
- ½ cup heavy cream
- 8 oz sour cream
- 2 eggs
- 15 oz ricotta
- ¼ cup grated parmesan
- Parsley, to taste
- 2 cups shredded mozzarella
- Preheat oven to 350.
- In large pot, cook pasta according to package directions.
- Dump alfredo sauce into a large bowl. Pour heavy cream into alfredo jar; replace lid and shake well, then pour contents into bowl. Add sour cream and mix well; set aside.
- In medium bowl, beat eggs, then add ricotta, parmesan, and parsley. Mix well; set aside.
- Drain cooked pasta; return to large pot. Add alfredo sauce mixture and stir to coat.
- Spread half of pasta in greased 9 x 13 baking dish.
- Spoon ricotta mixture over pasta in baking dish; spread evenly.
- Spread remaining pasta over ricotta mixture.
- Top with mozzarella.
- Bake 25-30 minutes, or until cheese is bubbling and beginning to brown.
Brown Sugar Carrots.
This is the only way I like my carrots.
I’m a pretty picky eater, but I do like a few basic vegetables (cauliflower, broccoli, green beans, peas, corn, and carrots). And this is by far the tastiest and easiest way I’ve found to eat carrots.

Easy three-ingredient carrots.
Here’s what you’ll need:

Ingredients.
- 1 lb carrots
- 2 Tbsp butter
- 1/3 cup brown sugar

Chop ’em up.
Wash, peel, and chop the carrots as thick or thin as you like.

All good things involve butter.
Melt the butter in a pan over medium heat.

Good things often involve sugar, too.
Once the butter has melted, add your brown sugar.
By the way, I know I listed 1/3 cup brown sugar, but let’s be honest: it tastes better with more like 2/3 cup. But that’s obviously not as healthy. Of course, we’re dumping our carrots into butter and sugar, so how healthy are we trying to be, really? But 1/3 cup is about the minimum amount of brown sugar that you need for these carrots to taste good, not just a little bit sweet.

Stir.
Stir butter and brown sugar to mix.

Add carrots.
Add chopped carrots; stir to coat.

Cover and simmer.
Cover pan and simmer on low heat for at least twenty minutes, stirring occasionally.

Apparently, carrots leak.
By the way: In the beginning, two tablespoons of butter doesn’t look like enough for a pound of carrots to “simmer” in, but as they cook, the carrots leak their own juice.
Typically, once I cover the carrots and lower the heat, I move on to making the rest of dinner, and let the carrots simmer for however long it takes to get the rest ready. I’m a big fan of overcooking vegetables, though, so you may not want them simmering for more than thirty minutes if you like to keep a little crunch.

All vegetables should taste like candy.
And that’s it! I’m a fan of easy.
And, for your cut-and-paste convenience:
Brown Sugar Carrots
- 1 lb carrots
- 2 Tbsp butter
- ⅓ cup brown sugar
- Wash, peel, and chop carrots.
- Melt butter in pan over medium heat.
- Add brown sugar; stir to mix.
- Add chopped carrots; stir to coat.
- Cover pan and simmer over low heat at least 20 minutes.
Lazy Chicken Dinner.
Confession: This is a lazy post.

Arrange two chicken breasts, two largish quartered new potatoes, and heaps of green beans in 8×8 baking dish; top with packet of Italian dressing mix and half stick of melted butter; cover with foil and bake 45 minutes at 350.
Not only is this a super easy dinner idea, but it isn’t even mine.
If you’re on Pinterest, you’ve undoubtedly seen this pin:
Look familiar?
It’s usually accompanied by something along the lines of:
“4-6 raw chicken breasts, new potatoes, green beans (fresh or canned-really any green veggie would work. Broccoli is good, too). Arrange in 9×13 dish. Sprinkle with a packet of Italian dressing mix and then top with a melted stick of butter. Cover with foil and bake at 350 degrees for 1 hour.”
Every pin I’ve seen of this image either leads to a broken link or to a page that, like mine, cites “Pinterest” as the recipe source; I got more of the same when I tried to Google-search the image. Honestly, I feel kind of bad for whoever first pinned this, because their blog traffic should have been outrageous due to the popularity of the pin. But no one seems to know where it came from!
Anyhow, I decided to give it a try last week. And it’s a winner. (Made it again already.)
I’m an incredibly picky eater (unless it’s chocolate, I mostly like only white and yellow foods–pasta, bread, cheese pizza, corn, popcorn, etc.–and I don’t like the taste of meat), but this dish is surprisingly good. I can eat all elements of it, and that’s rare for me. Add to that that it’s a one-dish wonder, with maybe five minutes of prep? SCORE.
All you need are five ingredients:
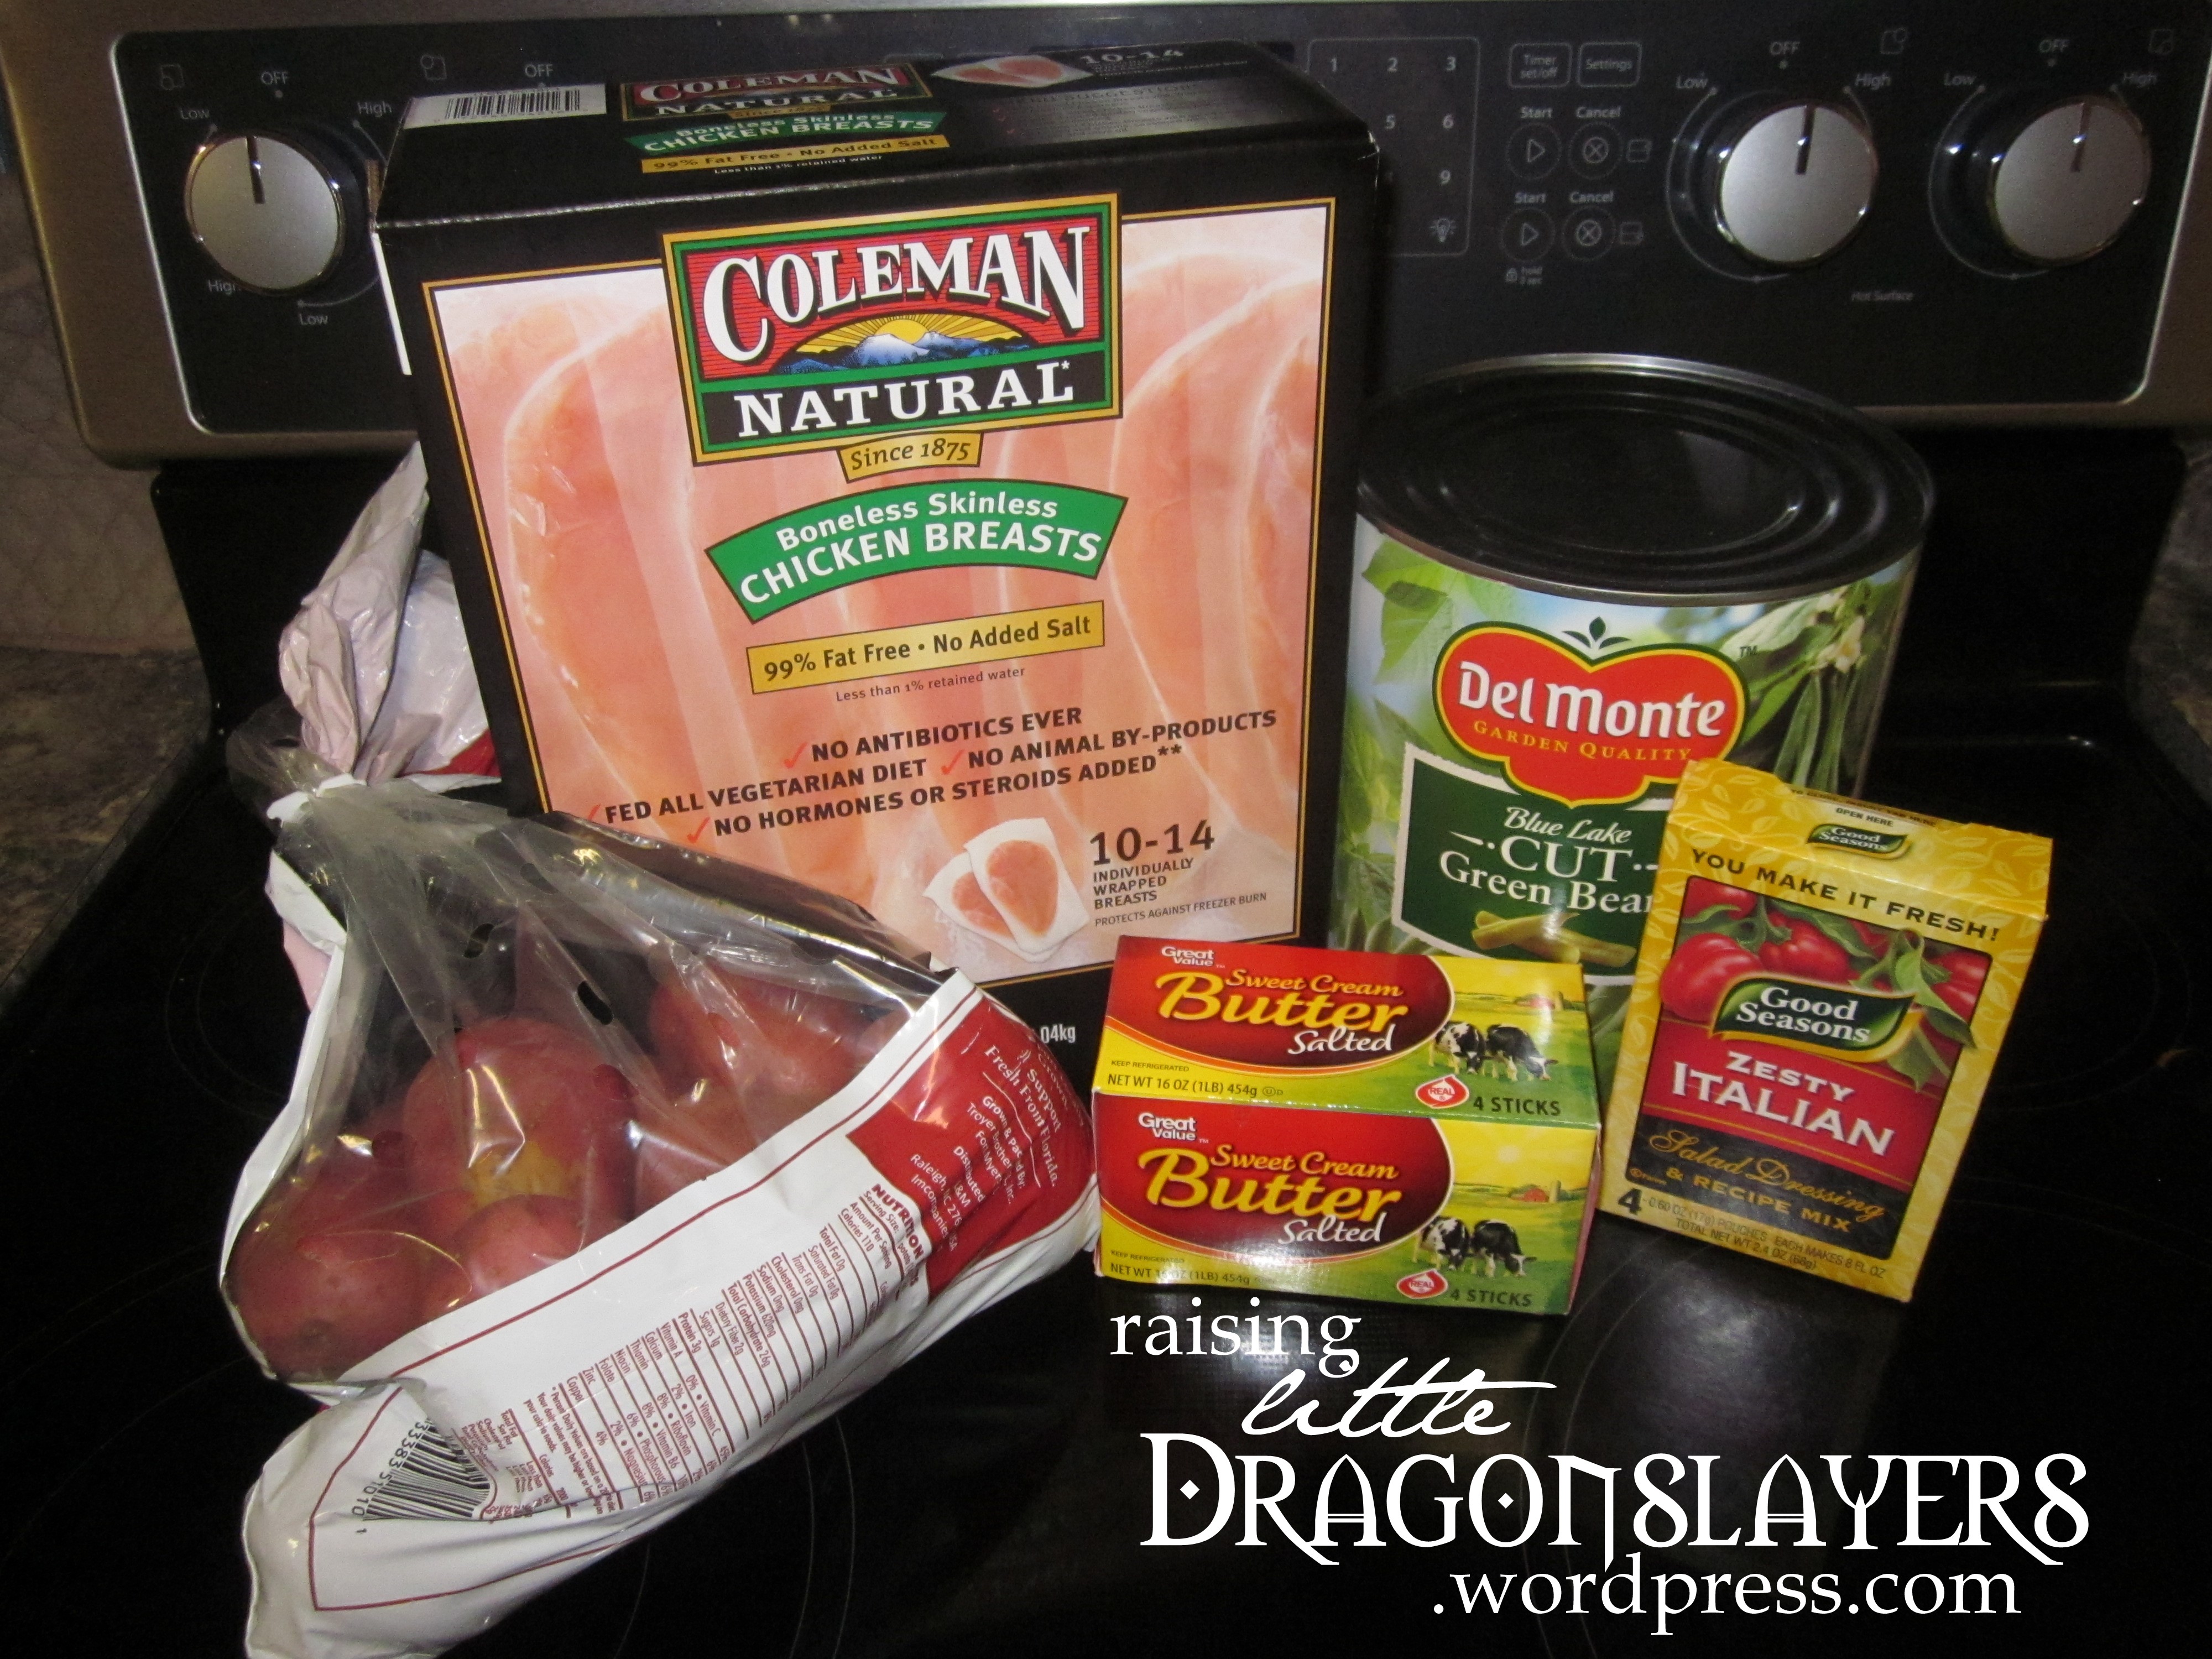
Ingredients.
- Chicken breasts
- Green beans
- New potatoes
- Italian dressing mix
- Butter
These are staples in my fridge and pantry, so there’s no shopping involved. So easy.

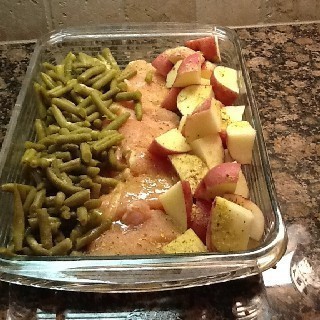
Arrange chicken, new potatoes, and green beans in baking dish.
I don’t eat much meat, and my almost-three-year-old is a light eater as well, so I use only two chicken breasts, two largish quartered red potatoes, and as many green beans as I can fit (we looooove green beans in this house–hence the five-pound can), arranged in an 8″ x 8″ baking dish.

Sprinkle with Italian dressing mix packet.
Although I basically halve the other quantities suggested, I still use the entire Italian dressing mix packet (I tried about 3/4 of the packet the first time, and the hubby suggested it could have used more seasoning; full packet was perfect!).

Top with melted butter.
I top with half a stick of melted butter.

Cover with foil and bake at 350 for 45-60 minutes.
With my smaller portions, we found that the chicken was too dry after baking for an hour, so I went with 45 minutes this time, and it came out perfectly juicy.

Done!
And that’s it.

Delicious full dinner–meat, veggies, and carbs–from items I keep stocked anyway and with almost no work? Yes, please!
This lazy chicken dinner is now in my regular rotation. Love it! (Thank you, anonymous person on the internet, for this wonderfully simple recipe!)
Recent Comments
ladyhawke41386 on Doing Dragon*Con with a b… SandraRae on Doing Dragon*Con with a b… ladyhawke41386 on The Chex Mix. mydearbakes on The Chex Mix. Casey Richey on Fried Cheesy Bites.
